Finally stop overthinking what to say and when. This free guide helps you write clear, consistent emails that sound like you — and build trust without burnout.
GRAB THE Client Experience Email GUIDE!
Blog Categories
A podcast where you join me (Colie) as I chat about what it takes to grow a sustainable + profitable business.
Business-First Creatives Podcast
CRM Guru, Family Filmmaker, and Host of the Business-First Creatives podcast. I help creative service providers grow and streamline their businesses using Dubsado, Honeybook, and Airtable.
Hey, I'm Colie
Oh hi – did you find your way here because you’re drowning in client work and inquiries, and you realize you need some better systems and processes in your business ASAP? If so, you’re not alone. I fully believe that during “busy seasons” we realize that we need a CRM the most, but it’s the LEAST ideal time to set one up. Fortunately for you, if you’re reading this, you’ve made a great choice choosing Honeybook. Honeybook is one of the easiest and fastest CRMs to set up, and it also happens to be one of my favorites (and if we haven’t met yet – systems are kind of my thing!).
Today, I’m going to walk you through how to set up your HoneyBook in less than 3 hours, in a way that WILL prepare you to welcome new leads and secure bookings with as little effort as possible.
New to Honeybook? Click here for 50% off your first year!
Why HoneyBook?
While I specialize in offering custom HoneyBook setups through Systems in Session (because let’s face it, getting into the nitty-gritty of CRM can be quite the task!), I understand that diving deep into a new system might seem overwhelming at first. If you were to set up every single detail of your CRM, it would probably take a little more than a day (after all, I do this for a living).
I don’t want you to feel discouraged though because the truth is – you don’t have to do it ALL to have your CRM work for you. I believe that if you’re setting up Honeybook for the first time by yourself, you can get the MOST important things done in less than 3 hours following these steps.
Suggested Honeybook Setup in 3 Hours
I’m going to walk you through these in detail below, but here is my suggested plan of action to spend 3 hours doing a bare minimum setup so that you can streamline part of your booking process before the busy season hits.
- Brand Account Settings (less than 30 minutes)
- Email Templates (30 minutes)
- Packages (10-15 minutes)
- Contract (10-30 minutes)
- Booking Smart File (10-30 minutes)
- Basic Inquiry Workflow (5-20 minutes)
- Contact Form (5-15 minutes)
So in 2-3 hours, you can be completely ready to process new leads into your account in Honeybook (or virtually any other CRM – click here for my Dubsado guide).
Step-by-Step Guide to Set Up HoneyBook in Less Than 3 Hours
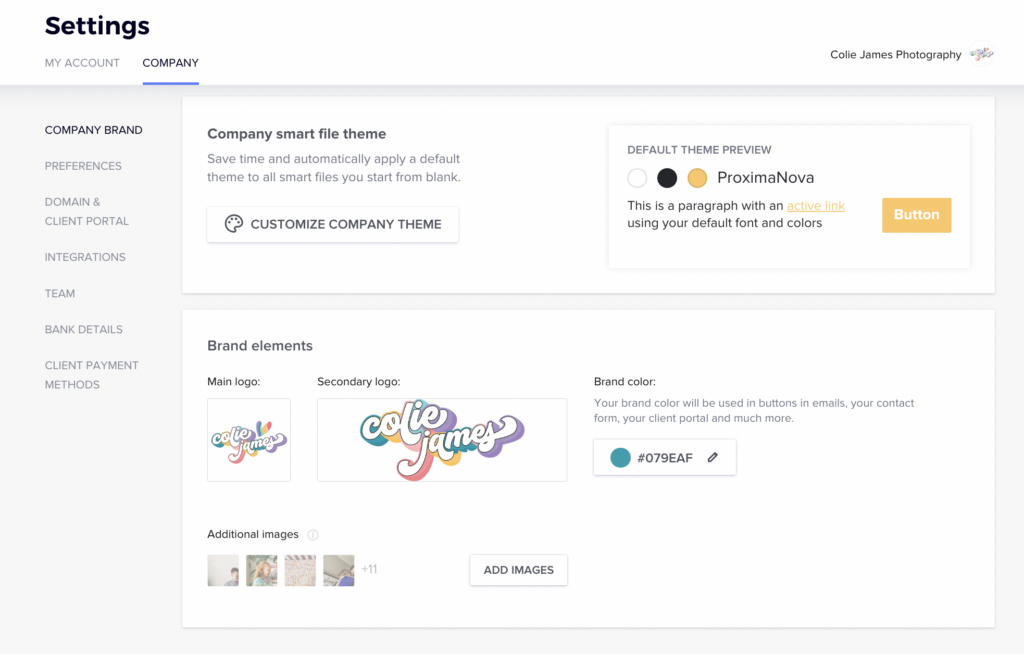
1. Basic Account Settings (less than 30 minutes)
First, we need to start by laying the foundation with your basic account settings. This involves:
- Uploading your logo and inputting your business name, brand colors, and contact details to make sure all your default Honeybook templates will feel personal and branded.
- Connect your email to send messages directly through HoneyBook, which makes sure that all communications are logged and easy to track.
- Sync your calendar to see your availability and avoid double-booking if you choose to use the native Honeybook scheduler.
- Link your bank account! After all, part of the reason you’re going to want to use a CRM is to get PAID!
2. Write Your Email Templates (30 minutes)
I really believe that effective communication is the key to happy clients. While you’ll likely grow your list of email templates over time, these ones are a good place to start if you only have 30 minutes!
- Inquiry Response: I recommend making this an automated lead response thanking them for reaching out, and letting them know when they can expect a response.
- Ask for the call: if you offer complimentary or paid consultations as a part of your inquiry process
- Send the Offer: Once you’ve had a consultation or discussed details, you need an email template that you can use when you’re ready to send a formal offer to the client
- Booking Confirmation: Confirm details and provide next steps to keep everything clear.

PSST: Want guidance to set it all up? I have a done with you service, Systems in Session, where we will design and implement your custom client experience inside Honeybook in 60 days. You’ll have access to templates, trainings, and 1:1 support from me as we build your systems together.
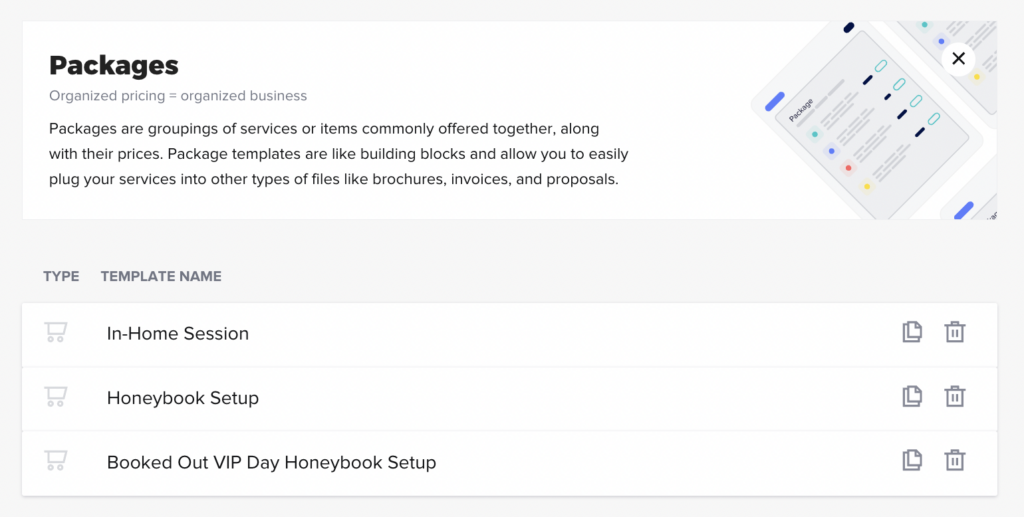
3. Create Your Packages (10-15 minutes)
While I would love to tell you to take your time with this and brainstorm every offer and what you might need, we only have three hours! Focus on your MAIN offer and outline it clearly and concisely. Make it easy for clients to understand what you offer and make a quick decision.
NOTE: Newer accounts may not have a specific packages template area. If you don’t, when you create a package inside any SmartFile, it is automatically saved as a template that can be used in any future SmartFile you create!
4. Contract (10-30 minutes)
While I will usually recommend purchasing a legal contract template or hiring a lawyer, Honeybook does have a free contract if you want to use that to get started (I’m not recommending this for legal purposes, I’m just letting you know it’s there). Whatever you decide to do, create a contract template and take advantage of Honeybook’s smart fields so that it will auto populate details like the client’s name, contact information, selected services, project date, and payment schedule to save you time in the future!
5. Booking Proposal (10-30 minutes)
I know we don’t have a lot of time here, but at the bare minimum, your proposal should include your logo, package prices, and client information fields. I recommend you set it up to automatically show both an invoice and the contract you created in Step 4. Simplifying this process helps you and the client move quickly from inquiry to booking (without needing anything from you, which ultimately slows down and adds friction to the booking process).
NOTE: this is my FAVORITE feature in Honeybook. I wrote ALL about it HERE.
7. Contact Form (5-15 minutes)
This is the form that you can use in lieu of a website contact form, or it can even be used as an Instagram landing page. NOTE: If you want to be able to book those mini-sessions instantly, you can create a Lead Form instead (I find this works especially well for photographers). Because we are doing a bare minimum setup now, start with HoneyBook’s default form to save time and customize it with more specific questions later as needed. This is your first point of contact, so add some personality where you can!
8. Basic Inquiry Workflow (5-20 minutes)
We are in the home stretch! This is another area you’ll want to come back to when you have more time but for now, your job is to string everything together. Connect your contact form to the automated lead response email you wrote in step 2. Set up your packages so that when someone accepts the proposal, Honeybook sends them straight to the contract, and once that’s signed, straight to the invoice. EASY.

Real Client Setups: What This Looks Like in Action
Have a little more than three hours and want to set up your entire Honeybook account with a wow-worthy client experinece? Check out Systems in Session, my done-with-you program where we design your entire client experience in HoneyBook over 60 days—templates, strategy, automations, and 1:1 support included.
Sometimes seeing the system working for someone else is exactly what you need to move from “I’ll get to it later” to “Let’s do this now.” Here are two powerful client transformations to show you what’s possible—starting from the same bare-bones setup you’re about to create.
Kelly Bullock: Luxury Client Experience, Fully Automated
Kelly is a luxury family photographer who wanted her client journey to feel intentional, high-touch, and seamless—without spending hours on manual work.
“Before working with Colie, everything was scattered—client info, emails, workflows. Now I feel confident my client experience reflects the level of service I provide. I have more time, less stress, and my systems are finally working for me.”
We designed and implemented a full HoneyBook setup through Systems in Session that allows Kelly to onboard new leads, book sessions, and send pre-session guides automatically. Her CRM now feels like an extension of her brand—elevated, effortless, and on-brand at every touchpoint.
➡️ Peek inside Kelly’s setup here
Brittany Herzberg: Booked Through Automations
Brittany, a visibility strategist and SEO copywriter, needed a system that supported her while she was supporting clients. Her main goal? Create automations that book dream clients while she’s offline.
“This wasn’t just a tech setup—it was business transformation. I now have a HoneyBook system that reflects how I actually work and sell. Inquiries don’t sit in my inbox anymore, and my leads are booking themselves.”
We built out a custom workflow inside HoneyBook—including email sequences, automations, and smart file templates—that guide leads from inquiry to booking with zero friction.
👉 Read Brittany’s full case study
Set Up Your HoneyBook in Less Than 3 Hours
And that’s it! I know it sounds like a lot but I promise you can get a bare minimum set up done in just an afternoon (and it will save you COUNTLESS hours during busy season when you’re running off your feet and your inbox gets a little out of control). No more searching for the client inquiry you *thought* you responded to!
New to Honeybook? Click here for an additional 50% off your first payment, month, or year!


© 2022-2025 Colie James
Close
Start dates available for Q1 2026
Enter your contact information to join the interest list for Systems in Session. You will get early access as spots become available with a booking bonus!
